When setting up a Treatment Plan, it is necessary to identify the Template, that will be used to create the sentences that appear in the Plan entry in the SOAP note.
This Template section provides 4 options for the Template that will generate the SOAP note text.
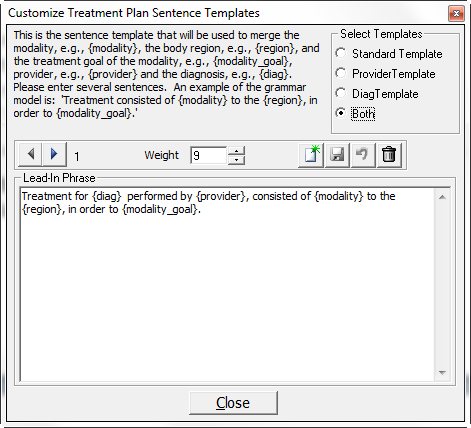
Click on Template to open the Customize Treatment Plan Sentence Templates window (figure 7).
Figure 7
On the upper right of the window there are 4 options for the format of the Sentence Template. The Template that will be used is automatically selected by ChiroPadEMR based on the entries made on the patient’s Plan window. Selection of the Template on this window is solely for Template set-up.
1. Standard Template – This is the basic format. It generates the Modality, the body Region, and the Goal of the selected Modality.
2. Provider Template – In a multi-Provider practice, as part of the Treatment Plan, there is the ability to assign a specific Provider to each Modality. When a Provider is assigned to a Modality, this Provider Template will automatically be used so that the SOAP note will include which Provider in the practice performed the Modality for the patient.
3. Diag Template – For thoroughness in documentation, it is beneficial to link each Modality performed to the Diagnosis that is the reason the Modality was used. As part of the Treatment Plan, there is the ability to assign a specific Diagnosis to each Modality. When a Diagnosis is assigned to a Modality, this Diag Template will automatically be used.
4. Both Template – In the event that both a Provider and a Diagnosis are assigned to a Modality, this Both Template will automatically be selected so that the Provider and Diagnosis will appear in the SOAP note for the Modality(ies) selected.
On the upper left of the Customize Treatment Plan Sentence Templates window is a description of the Insertion Merge fields that can be used with the Sentence Templates. When adding or creating a new Template, the Insertion Merge fields may be typed in. Be sure to use the correct bracket in order for the Insertion Merge field to work. The selection of each item is pulled from the patient’s Plan window.
I. {modality} inserts the Modality selected
II. {region} inserts the Body Region that was linked to the Modality
III. {modality_goal} inserts the Goal Verbiage for the Modality selected
IV. {provider} inserts the name of the Provider that was linked to the Modality
V. {diag} inserts the Diagnosis that was linked to the Modality
To view all the Verbiage Templates for each item, use the Right and Left Arrows to scroll through the list.
Note that the more iterations, the greater will be the variation and randomization in your notes.
Each Iteration Template is assigned a Weight between 1 and 9. This Weight determines the frequency with which each iteration will be used by ChiroPadEMR. The higher the number, the greater will be the randomization of the verbiage. For example, if there were only 2 Iteration Templates and Template A has a Weight of 1 while Template B has a Weight of 9, for each time Template A appears, Template B will appear 9 times. For the greatest degree of text randomization in the SOAP notes, give every Iteration Template a Weight of 9. Note that the more iterations, the greater will be the variation and randomization in the SOAP Notes.
Note that each Sentence Template for the Treatment Plan is a complete Sentence. If the Verbiage is changed, make sure that it fits the format of a complete sentence.
To change the Verbiage Template, place the cursor/mouse in the box. Edit the contents as if it were a word processor program. Make sure to click the Right Arrow or Left Arrow to make the appropriate changes to every Verbiage Template iteration.
•If only a couple of words are being changed, then make the changes and click the Save icon at the upper right of this window.
•If the entire phrase is to be changed, then highlight the phrase and click the Delete (Garbage Can) icon. Now proceed to create a New Template.
•To create a New Verbiage
Template, click the New icon  , verify that the correct Template option has been
selected, place the cursor in the Verbiage Template box, type in
the desired Verbiage
using the appropriate Insertion
Merge Fields and click the Save icon.
, verify that the correct Template option has been
selected, place the cursor in the Verbiage Template box, type in
the desired Verbiage
using the appropriate Insertion
Merge Fields and click the Save icon.
•If a mistake is made and it is necessary to Undo the Verbiage Template that was created, click the Undo icon, the circular arrow between the Save and Delete icons. Note that Undo functions ONLY BEFORE the Save icon has been used.