Select the provider from the dropdown list. The list of providers includes all Active providers that have been entered in the Provider catalog. Select a day of the week on the left side of the window from the drop down box. In the middle section, select the Time interval between appointments. This is the number of minutes being assigned for each available appointment time. Now choose the number of Slots that will be available for each appointment time. A Slot represents the number of appointments per Time interval. The ideal setting is 1 time slot for each time interval. Base the interval on the amount of time you usually spend with a patient. For example, if this is typically 5 minutes, then set the time to 5. Each time slot may be set from 5 to 180 minutes, in 5 minute increments.
•Note 1: many paper appointment books allow for the scheduling of patients at 15 minute intervals, and provide 3 openings for each. In effect, this is the same as 1 appointment every 5 minutes. By setting only 1 slot for every 5 minutes in ChiroSuiteEHR, the same scheduling is accomplished.
•Note 2: in the User Security section of ChiroSuiteEHR, the office manager has the ability to set which staff members have the authority to overbook a time slot and which staff members will be restricted to entering only 1 appointment per time slot.
For the day of the week that this schedule will apply to, place a check in the box next to either or both Morning and/or Afternoon. Define the start and end times for each part of the day. It is recommended that the start times should be 15 to 30 minutes earlier than the actual posted office hour start time, and end 15 to 30 minutes after the posted close time. Having the schedule available with some extra time slots both before and after official hours makes it easy to deal with special last minute cases that need to be scheduled either early or late. The up and down arrow keys next to the start and end time boxes will increase or decrease the amount of time allotted for each appointment in the Time box.
Once the Time, Slot, Morning and/or Afternoon hours have been chosen, click Generate to create a list under Schedule Templates based on the entries made. Review the list and verify that it is the way the practice and provider require it. If necessary, make changes and then click Generate again. Selections may be changed and regenerated as frequently as desired.
When the listing under Schedule Templates appears as desired, click Add All to move the entire listing to the Review, Edit and Save Daily Schedule on the right. Once again, verify that it is the way the practice and provider require it. Once the schedule is set the way you want it, be sure to click the Save icon just above and to the right of the Review, Edit and Save Daily Schedule.
In the event that there is a specific time slot that needs to be added to an existing schedule, click on that specific time in the Schedule Templates list on the left to select it, then point the mouse at the highlighted time and right-click to bring up a mini-menu that enables the selection of Add or Add All. Click Add in the mini-menu to enter that specific item in the Review, Edit and Save Daily Schedule. Clicking Add All from the mini-menu has the same effect as clicking the Add All button. As you might expect, holding the [Ctrl] key as you click enables multiple times to be selected, then right-click and choose Add to copy to the Review, Edit and Save Daily Schedule.
Repeat this process for each day of the week that the provider treats patients. In multi-provider offices, repeat the process for each provider.
To remove a specific time from the Review, Edit and Save Daily Schedule, click on the time in that box to highlight it, and then right click on it. The mini-menu that appears includes a Delete option, and that time Slot can be removed. As before, the [Ctrl] key enables multiple selections prior to deleting. When the schedule appears as desired, click the Save icon under Review, Edit, and Save Daily Schedule.
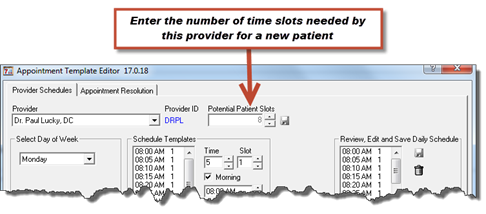
A patient’s initial visit, with examinations and consultations takes more time than a regular office visit. To accommodate this extra time with a potential (that is, new) patient, ChiroSuiteEHR uses the Potential Patient Slots field to set the number of slots occupied when a potential patient is scheduled. The patient is not considered truly new until he/she arrives in the practice. See figure 9. Example: the provider normally spends 5 minutes on a regular visit, but spends 40 minutes on the initial visit. To accommodate the 40 minute new patient appointment, the number of Potential Patient Slots should be set to 8. 8 slots at 5 minute each provides the 40 minute appointment.
Continue this process to create a schedule for each standard workday for each provider.
Figure 9