When setting up a Treatment Plan, it is necessary to identify the Phase of Treatment for the patient. This point of documentation is required by all State Boards, the Federal government, and many insurance programs.
Note that some States mandate the specific names of the Phases of Treatment, while others only require a general outline. Be sure that the practice is obeying the laws and regulations of the State it is located in.
This Phase of Treatment section includes the names of various Phases of Treatment.
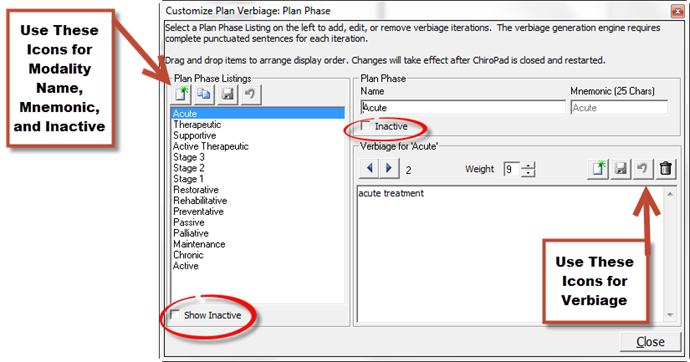
Click on Phase to open the Customize Plan Verbiage: Plan Phase window (figure 8).
Figure 8
Before creating a new Phase of Treatment, place a check in the box to Show Inactive. The desired item may already exist in the system but be classified as Inactive. If it is Inactive, by clicking Show Inactive all the Inactive items are returned to the list. Click on the item to highlight it, uncheck the Inactive checkbox just below the Plan Phase Name and click the Save icon on the left in the Plan Phase Listings box.
There are 2 methods of creating a new Phase of Treatment. Both are done using the icons on the upper left of the window.
5. New Icon: Create the name of the new Phase of Treatment by clicking on the New button on the left under the heading of Plan Phase Listings. In the Plan Phase box on the right, type in the name of the Phase of Treatment, and enter a Mnemonic. The Mnemonic is essential to the computer’s internal functions and MUST be entered. This is the only place where you will see the Mnemonic. When finished, click on the Save button on the left that is adjacent to the Clone button.
6. Clone Icon: If the new item is very similar to one that already exists, to minimize the verbiage entries, click on the Clone button. Enter a new Plan Phase Name and a new Mnemonic for the cloned item. A new item created by using the Clone button will contain all the verbiage from the original Plan Phase item. For each verbiage iteration in the Cloned item, it is necessary to review every iteration and revise the verbiage to be appropriate for the newly created Plan Phase. When finished, click on the Save button on the left that is adjacent to the Clone button.
The Plan Phase Listings can be rearranged by using your mouse. Click on a Plan Phase Name. While holding the left mouse button down, drag the Plan Phase item either up or down the list. When you let go of the mouse button, the Plan Phase item will now appear at that point of the list. The order which you see on this screen is the same order in which the Plan Phase list will display in the Plan window.
Regardless of which method was used to create the new Plan Phase, it is required that the Verbiage is either created or verified. This is done in the Verbiage box on the lower right.
In the Plan Phase Listing column on the left, click on the Name of the Plan Phase so it is highlighted. The first Verbiage iteration for that item will appear in the Verbiage box on the lower right. If there is NO Verbiage, the box will remain blank. If there is Verbiage, use the Right and Left Arrows to scroll through the Verbiage iterations for this specific Plan Phase of Treatment.
Note that each iteration for a Plan Phase of Treatment is NOT a complete sentence. It is only the name of that Plan Phase of Treatment.
Each Iteration Template is assigned a Weight between 1 and 9. This Weight determines the frequency with which each iteration will be used by ChiroPadEMR. The higher the number, the greater will be the randomization of the verbiage. For example, if there were only 2 Iteration Templates and Template A has a Weight of 1 while Template B has a Weight of 9, for each time Template A appears, Template B will appear 9 times. For the greatest degree of text randomization in the SOAP notes, give every Iteration Template a Weight of 9. Note that the more iterations, the greater will be the variation and randomization in the SOAP Notes.
If the Verbiage box is blank, or if there is a need to add another iteration to those that already exist, click the New icon at the top right of the Verbiage box. The box will be blank. Type in the Plan Phase Name and click the Save icon that is above the Verbiage box. If the Plan Phase has more than one synonymous Name, then enter it as another Verbiage iteration. Should another Verbiage iteration be desired, repeat the process of creating a new iteration, and continue repeating this process until all the Verbiage iterations that are wanted have been entered for the selected Plan Phase.
Editing the Plan Phase Verbiage is easy to do. In the Plan Phase Listing column on the left, click on the Name of the Plan Phase of Treatment that is to be edited so it is highlighted. Use the Right and Left Arrows to scroll through the Verbiage iterations to find the item to edit. Edit the Plan Phase Verbiage and click the Save icon.
If a mistake is made and it is necessary to Undo the Verbiage Template that was created, click the Undo icon, the circular arrow between the Save and Delete icons. Note that Undo functions ONLY BEFORE the Save icon has been used.
If it is decided that a specific Verbiage iteration should be permanently removed from the system, locate the item and click the Delete (Garbage Can) icon.
There may be one or more Plan Phase items that are not wanted. To take a Plan Phase off the list, click on the Plan Phase Name in the Plan Phase Listing box, place a check in the Inactive box in the center of the screen, and click the left Save button above the Plan Phase Listing column. This hides the item but does NOT remove it from ChiroPadEMR.