There are hundreds of ICD codes that each practice has the potential to use. Most doctors, based on the area of specialization, use only a handful of those codes. Creating and using Diagnosis Patterns (figure 13) in ChiroSuiteEHR enables the categorization and rapid usage of the ICD codes that are commonly used in the practice. It eliminates the need to scroll through hundreds of codes to find the one that is needed.

Figure 13
The lower portion of the Diagnosis Window shows the Diagnosis Patterns. Click the Pattern that contains the ICD codes that are needed, and the list appears in the box on the right. Select the ICD items needed for this diagnosis by clicking on them. Be sure to choose them in the order in which they should appear in billing (on the CMS-1500 form) and in the SOAP notes. If ALL the codes need to be applied, and they are in the order which is desired, click the Select All button. If selections were made in error and there is a need to start over, click the Select None button, or simply click the specific item a second time. After making the selection(s), click the Apply button on the lower right. This moves the selections to the Diagnosis Sets section at the top of the window. In order for the diagnosis to take effect, the Save button MUST be clicked.
The Diagnosis Patterns are user modifiable. This means that each office has the ability to create, edit, and/or delete Diagnosis Patterns. Access the customization area by clicking the Customize DX Patterns button (circled in red in figure 13).
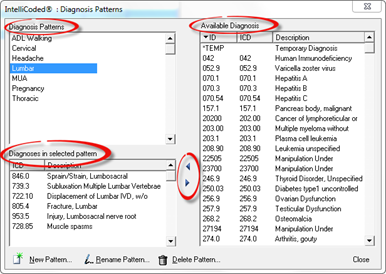
The window labeled IntelliCoded: Diagnosis Patterns opens. It consists of 3 boxes: Diagnosis Patterns, Diagnoses in Selected Pattern, and Available Diagnosis (figure 14).

Figure 14
The Diagnosis Patterns box lists the patterns that have already been created. The list is in alphabetical order. Any new pattern that is created will be placed in the box alphabetically. To see which ICD codes are in a specific pattern, click once on that pattern so it is highlighted. The ICD codes that it contains will be displayed in the Diagnoses in Selected Pattern box on the lower left.
A new pattern is added by clicking on the New Pattern button on the lower left corner. This opens the Add a New Pattern pop up (figure 15). Simply type in the name of the new pattern and click OK. The new pattern is now listed alphabetically in the Diagnosis Patterns box at the top left.

Figure 15
Click on the new pattern that was just created. The Diagnoses in Selected Pattern box is empty. From the Available Diagnosis box on the right, select each diagnosis that should be included in the pattern, and click on the Left Arrow (ß) to move it into the Diagnoses in Selected Pattern box.
NOTE: The Available Diagnosis box is enabled to sort the list of diagnoses in 3 ways. There are 3 columns in the box; ID, ICD, and Description. Click on each column heading to sort the list by that criteria. The ID and ICD sorts are in numeric sequence. The Description sort makes the list alphabetical.